Showing posts with label cookbook. Show all posts

Grilled Snapper in Banana Leaves

Grilled Snapper in Banana Leaves
This grilled fish in banana leaves recipe from the Seafood book allows the fish to steam in its own moisture and the leaves give a smoked flavour. 

1 red snapper about 3 lbs scaled and gutted
2 to 3 banana leaves
1 tsp sesame oil for the banana leaves
lime wedges to serve

For the marinade
2 tbsp coarsely chopped cilantro
1/2 tbsp grated ginger
2 garlic cloves chopped
2 tbsp rice wine vinegar
grated zest of 1 lime
1 red chillie seeded and chopped
salt to taste 
pepper to taste

Make 3 to 4 slashes on each side of the fish nearly to the bone. Put the marinade ingredients into a blender and chop. Press this mixture into the slashes and set aside for about 20 minutes.
Blanch the banana leaves in boiling water for 30 seconds to soften then remove with tongs and rinse in cold running water. Cut the thick vein from the center of the banana leaves. Then arrange them overlapping on a large cutting board, shiny side down. Brush with sesame oil, and put the fish on the leaves and wrap to encase the body, the head and tail can be visible. If needed secure the leaves with cocktail sticks.
Grilled Snapper in Banana Leaves
Grill or Bake
Preheat the grill to make it really hot and cook the fish turning often to prevent the leaves from burning, it will take about 20 minutes.
It can also be baked at 375F for 20 minutes, I wrapped the banana leaves with foil to prevent it from burning and turned it once during the baking time.   

Insert a metal skewer into the center of the fish through the leaves for 30 seconds. If the fish is cooked, the skewer will emerge piping hot. Transfer to a serving dish and garnish with lime wedges. Unwrap at the table and serve with rice.

All rights reserved on photographs and written content Torviewtoronto © 2010 - 2013 unless mentioned. Please Ask First

Making Classic KFC Coleslaw at Home

This classic coleslaw recipe from the CopyKat.com's book allows us to recreate the coleslaw sold at KFC. 

10 cups diced green cabbage
1 cup diced green bell pepper
1/2 cup grated white onion
1/2 cup shredded carrot
2 cups Miracle Whip Light dressing
1/2 cup sugar
1/4 cup white vinegar
1/4 cup vegetable  oil

Tips on Grilling and Grilled Steak

I made this flavourful steak by following the recipe of the Indian spice rub mix from the Grill It DK book. This book is perfect to learn about techniques and tips of grilling a variety of meat, seafood, vegetables and desserts.  
It has information on how we can check the doneness of the meat, and also recipes on using different spices and herbs to enhance flavour. The spice rubs and spice pastes in the book are inspired from different countries.
All purpose Indian Masala Rub makes 1 cup
1/4 cup coriander seeds
2 tbsp cumin seeds
2 tbsp yellow mustard seeds
2 tbsp fennel seeds
2 tbsp peppercorn
2 tbsp salt
2 small dried chillies or 1/2 tbsp chillie flakes
1 tbsp ground ginger
1 tbsp ground turmeric

Lightly dry roast all the ingredients except for the salt, ginger and turmeric then grind it to a coarse powder.
6 t-bone steaks
1 tbsp olive oil per steak

Heat up the grill to 400F, when the fire is hot. To check if it is hot count how many seconds by keeping the hand 5" above the grill if it is hot you will feel it in 1 to 2 seconds.
Rub the steaks with oil then the spices on both sides. Put the steaks in the hottest part of the grill and cook each side until it is well seared about 6 to 8 minutes, turn only once. 
Move the steaks to the cooler side of the grill, cover with a metal pan or disposable foil pan and cook slowly till it is done a little less than to your liking for about 8 to 10 minutes per side. If the meat is overcooked when it cools it will become hard. Remove from the grill, cut strips and serve with a dip or salad.
I served with a tomato and onion salad.
Happy Canada Day to all my friends in Canada and Happy 4th of July to all my friends in US. With lots of grilling and entertaining happening lets make sure to follow these four food safety steps.

Clean: Make sure to clean all utensils, hands, and surfaces with soapy water. If you’re going to be outside, using a moist towelette is a good idea. 
Separate: Don’t put meat items back on the same plate you used for the raw meat. Make sure to bring separate plates for grilling raw meat from fruits and veggies.
Cook: Hamburgers should be cooked to 160F before serving. Remember, just because it’s brown doesn’t mean its safe use a food thermometer every time. 
Chill: The general rule is to never let food sit at room temperature for more than 2 hours. 

All rights reserved on photographs and written content Torviewtoronto © 2010 - 2013 unless mentioned. Please Ask First

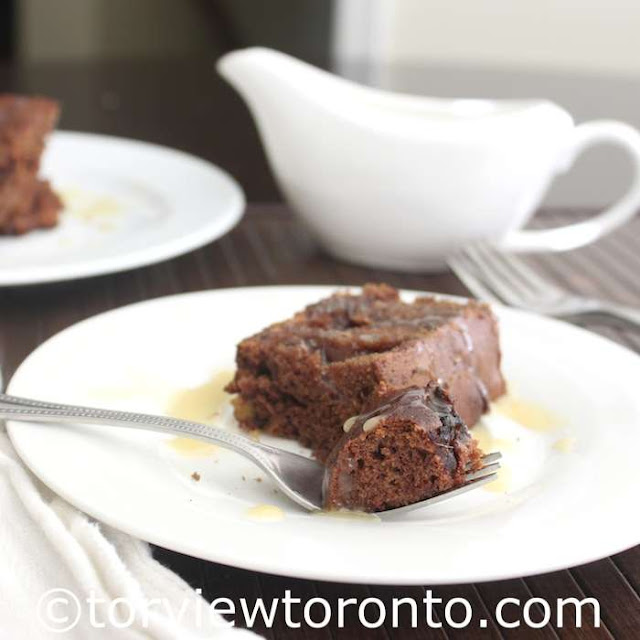
Sticky toffee Pudding

Sticky toffee Pudding
the cake
9 tbsp unsalted butter at room temperature
1 cup pitted dates 
2 tsp baking soda
1 cup water
2 cups flour
1 cup brown sugar
1 tsp salt
3 eggs

In a pan simmer the dates with the baking soda and water for 5 minutes until it is soft. Puree with the cooking liquid in a blender. 
In a bowl add the butter, sugar, salt, eggs and sifted flour. Using a mixer, blend everything until it is combined. Mix the date puree into the mixture. 
Prepare the 9 x 13 baking dish with butter, then add a few of the simmered dates coarsely chopped and pour the mixture. Bake in a 375F preheated oven for 35 to 40 minutes until the cake is firm to the touch. Turn out onto a plate and drizzle with toffee sauce before serving.

toffee sauce
3/4 cup brown sugar
5 tbsp unsalted butter cubed
2/3 cup heavy cream
pinch of salt

Prepare the sauce while the cake is baking. Melt the sugar, butter and cream together in a pan until it is smooth and combined. Stir in the salt and allow to boil for a few minutes. Serve the warm pudding with the hot toffee sauce.

The pudding and sauce can be made up to 2 days ahead and reheated before serving. We can also make in 8 individual 7 oz ramekins and bake for about 20 to 25 minutes. 
This sticky toffee pudding is adapted from the DK baking book.
Sticky toffee Pudding
All rights reserved on photographs and written content Torviewtoronto © 2010 - 2013 unless mentioned. Please Ask First

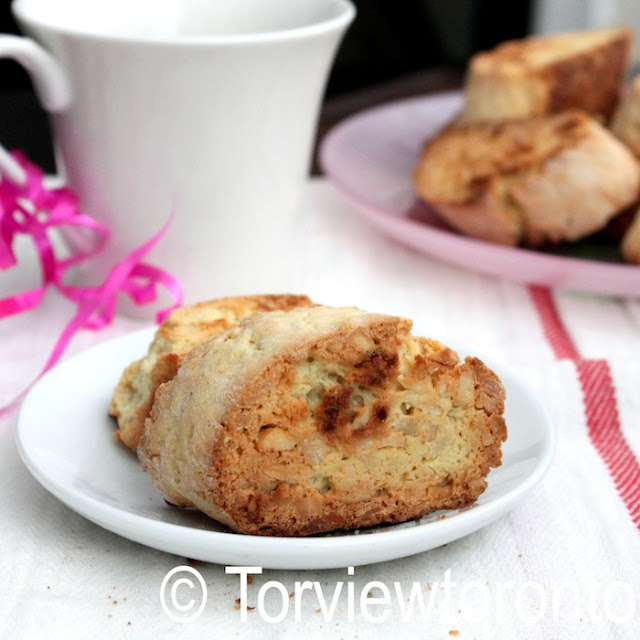
Almond Biscotti

almond biscotti
1 cup whole almonds skinned
1 1/2 cups flour
1/2 cup vanilla flavoured sugar
1 tsp baking powder
1/2 tsp salt
2 eggs 
4 tbsp unsalted butter melted

Melt the butter in a small pan over low heat until it melts and leave it aside to cool.  

Remove the skin of the almonds by soaking it in warm water for a few minutes and it will come out easily.  Spread the almonds on a baking sheet and bake in a 350F for 5 to 10 minutes until slightly coloured, toss halfway.  Allow the almonds to cool and then chop it coarsely.

Sift the flour with baking powder and salt into a big bowl.  Stir the sugar and chopped almonds into the flour.  In a separate bowl whisk the eggs and melted butter then add it to the flour mixture.  

Use your hands and bring the ingredients together to form a dough. Turn the dough onto a floured work surface and make 2 log shapes each about 8" long.  Place the logs on a baking sheet and bake in the middle rack of a preheated 350F oven for 20 minutes.  

Remove the logs from the oven and cool slightly then transfer it to a cutting board.  Use a serrated knife and then cut the logs diagonally into 1 1/2" to 2" thick slices.  Put the biscotti on a baking sheet and bake for 10 minutes, then flip and bake for another 5 minutes.  

Cool the biscotti on a wire rack to let it harden.  To store keep the biscotti in an airtight container for over a week.

The biscotti can also be frozen, by placing the biscotti on a baking sheet and freeze until it is solid then transfer it to a freezer bag.    

This recipe is from the DK illustrated step-by-step baking book.  I really like this book because of its detailed explanations and photographs. This book gives 80 classic recipes and has about 240 variations for these classics.  We can use the details and step-by-step photographs from the classic recipes to build on different variations.  The book covers a huge range of sweets and savouries such as tarts quiches, pies, breads, cakes, cookies, meringues, soufflés and a variety of party desserts for special occasions.  

All rights reserved on photographs and written content Torviewtoronto © 2010 - 2013 unless mentioned. Please Ask First

Win your own book to Celebrate Cooking with Quinoa

Celebrate the International Year of Quinoa in 2013 with this book Cooking with Quinoa for Dummies written by Cheryl Forberg.
Quinoa is a "super food" that nearly disappeared in the 1500s as Spanish explorers destroyed Qunioa fields to break Incas' morale.  Qunioa survived in isolated places in high altitude regions until it was rediscovered and became available in South America in the 1970s.  Qunioa is increasingly becoming popular in North America because it is an easy to digest seed that has lots of nutriets, fibre, protein and more.
Cooking with Quinoa For Dummies has over 140 gluten-free recipes, including Thai Quinoa-Coconut Chicken Soup, Quinoa Currant Hotcakes, Grilled Chili Beef with Quinoacado Relish and Quinoa Chocolate Cake.  Making quinoa in different ways will help keep it interesting to enjoy it all the time.  It is even served in high end restaurants such as in Silks Dining Lounge.  
Forberg provides information on how to properly prepare quinoa, it health benefits and on how we can substitute it into our favourite meals.  Quinoa will transform our diet, health and life.  

There are lots of useful information about nutrition and other food as well, here are a Quinoa specific information from the book.

  • The white, red and black quinoa have a slightly different taste.  
  • To cook 1 cup of quinoa we will need to use 2 cups of liquid; it is a 2:1 ratio.  
  • 1/2 cup of dried quinoa is equal to 1 1/2cups cooked quinoa, it is a 3:1 ratio.  
  • Basic rule is to simmer the quinoa for 15 minutes (maybe a bit more) when it is ready we will smell its aroma strongly and the kernels will be translucent all the way through and germ will spiral out like a short thread on each kernel.
Cook the quinoa with the water in a pan by bringing the water to a boil then reduce the heat to simmer, cover and cook until the water is absorbed.  We can also cook the quinoa in the rice cooker.  Fluff it with a  fork and use it in any recipe.  

Asian Quinoa Coleslaw recipe adapted from this book
1 1/2 cups cooked quinoa
2 tsp olive oil
1 cup onion chopped
1 tbsp garlic minced
2 tbsp fresh ginger chopped
4 cups green cabbage finely shredded
1 cup carrot grated
1/3 cup cilantro without stem chopped 
1 tbsp soy sauce
salt to taste
2 tsp lightly toasted sesame seeds optional

Heat the oil then sauté the onion.  Add the garlic and ginger.  Add the cabbage, cover the pan and cook for a minute.  Remove the cover and stir-fry the cabbage until it is softened for about 2 minutes.  Add the quinoa and grated carrot and cook for 2 minutes until it is heated through.  Add the cilantro, soya sauce, salt and sesame seeds.  Serve it warm.

Giveaway:
Looking forward to hear if you have you cooked with Quinoa before, if so what is your favourite thing to make with Quinoa?
3 people in Canada or US can win this fabulous cookbook.  Giveaway ends on February 10th.
To win enter through the rafflecopter below.
a Rafflecopter giveaway

All rights reserved on photographs and written content Torviewtoronto © 2010 - 2013 unless mentioned. Please Ask First

Pickled celery

1/4 cup white vinegar
1/4 cup water
1 tbsp kosher salt
1 1/2 tsp sugar
2 stalks celery thinly sliced

Mix everything together in a jar and leave the mixture in the fridge for about an hour before enjoying it tossed in a salad or on its own :)
The longer the pickle is kept the more tastier it is.  This recipe is from The Smitten Kitchen cookbook

All rights reserved on photographs and written content Torviewtoronto © 2010 - 2013 unless mentioned. Please Ask First

Milk cakes from the Bengali Five Spice Chronicles

This recipe for milk cake or kalakand is from the book Bengali Five Spice Chronicles.  My family enjoyed the flavour of this delicious dessert, which as the author mentions is a cross between cheesecake and milk fudge.  
1 can (14oz) evaporated milk
1 1/2 cup ricotta cheese
3/4 cup milk powder
3/4 cup sugar
2 tbsp ghee or clarified butter + 1/2 tbsp for greasing the dish
1/2 tsp cardamom powder
3 tbsp coarsely chopped pistachios


Put the evaporated milk, ricotta cheese in a pan and bring to a simmer.  Continue cooking the mixture on low heat for about 20 minutes, stirring it frequently until the mixture thickens considerably.

Add the milk powder, sugar and continue cooking until the mixture has a soft fudge-like consistency for about 20 to 30 minutes.
Mix in the 2 tbsp ghee and cook for another 3 to 4 minutes.
Grease an 8" or 9" dish and pour the cheese mixture.  Sprinkle the cardamom powder and pistachios over the mixture and let it cool.  I left it in the fridge to solidify before cutting the cake into 2" squares, we can also cut into any desired shape before serving it cool.
This book Bengali Five Spice Chronicles is written by Rinku Bhattacharya.  The book explores the cuisine of Eastern India and has over 180 recipes that are seperated into 13 parts such as rice & breads, lentil, vegetarian, egg dishes, fish, poultry, chutneys, drinks, snacks, sweets etc.  The book is full of delicious recipes and there are a few pictures of the dishes in the middle of the book. 
I like the explanations given by the author about different spices/seeds.  I also liked reading about the author and her influences that led to write this book.  

I find it interesting to read about other cultures and traditions, so I enjoyed reading the history of Bengali cuisine in the beginning of the book.  I thought it was interesting that Bengalis eat rice with different vegetables and then eat non-vegetarian food such as fish in the end, because we tend to eat it together or in the opposite way by eating non-veg first then with rice and vegetables :) 


Giveaway:
If you are in Canada or US and would like to win a copy of this book Bengali Five Spice Chronicles please enter through the rafflecopter below before December 15th.
Update: The winner is Tina


All rights reserved on photographs and written content Torviewtoronto © 2012 unless mentioned. Please Ask First

Mejadra rice from the fabulous Jerusalem cookbook

Jerusalem cookbook is a fabulously written book filled with  beautiful pictures and delicious recipes.  I enjoyed travelling to Jerusalem through this book.  The authors Sami Tamimi is from the muslim east and Yotam Ottolenghi is from the Jewish west. They both have lived in Jerusalem in the 70s and 80s as children and left in 1990 to Tel Aviv, then to London. They both met each other in London and became good friends and business partners. Both the authors feel that Jerusalem is "home" because it defines them. I think many of us call "home" a place that defines us and not necessarily where we live, it is where our hearts find comfort, excitement and joy.  

Jerusalem has a diverse group of people living there from a variety of background, which influences its cuisines.  The authors say when we look at the greater pictures there are lots of similarities in the food that is made and enjoyed in Jerusalem i.e. cucumber and tomato salad, stuffed vegetables, pickles etc...

Throughout Jerusalem they have a common middle eastern hospitality that goes back to the days of prophet Abraham or Ibrahim (Peace Be Upon Him).

The food is what break down the boundaries of conflict that people in Jerusalem have set.  The authors say, "It takes a giant leap of faith... to imagine that hummus will eventually bring Jerusalemites together, if nothing else will."

We have been forewarned by the authors that the recipes are modified to suit the western modern lifestyle as the ingredients are adjusted to availability, less oil and ease of making.  Therefore the recipes may not represent the realities of how the food is really made in Jerusalem.

I liked reading the religious history of Jerusalem that was in the beginning of the book.  The authors say that if people acknowledge the city as part of the "world heritage" and share, accept and coexist then it would be peaceful.  I found the dishes in the book full of flavour and comfort and would really encourage and recommend this book, which is available at bookstores and online.

Here is a comforting rice and lentil meal, known as Mejadra that we enjoyed.  This recipe is adapted from the book as I changed it a little bit because I can easily find ready-made fried onions at the Indian/Middle Eastern section of the grocery store.


1 1/4 cups green or brown lentil

1 1/2 cup crispy fried onions*
2 tsp cumin seeds
1 1/2 tbsp coriander seeds
1 cup basmati rice
2 tbsp olive oil
1/2 tsp turmeric
1 1/2 tsp allspice ground
1 1/2 tsp cinnamon ground
1 tsp sugar
1 1/2 cups water
1/2 tsp salt
1/2 tsp or more to taste pepper freshly ground


*In the book they thinly slice 4 medium onions.  Then coat the onions with 3 tbsp flour and a tsp of salt before frying it in a cup of hot oil over medium high heat, for about 5 to 7 minutes until the onions are golden brown and crispy.


Next time, I will reduce the lentil by 1/4 cup and lightly crush the cumin and coriander seeds before toasting.

Place the cleaned, washed lentils in a small pan and cover with plenty of water then bring to a boil and cook for 12 to 15 minutes until the lentil are soft but still have a little bite.

In a saucepan over medium heat toast the cumin and coriander seeds for about a minute or two.  Then add the rice, olive oil, turmeric, allspice, cinnamon, sugar, salt and pepper.  Stir to coat the rice with the oil then add the cooked lentil with the water.  I made sure there was a 1" of water after putting the rice into the pan.  When it comes to a boil, cover with a lid then simmer over low heat for about 15 minutes.

Remove from heat, lift off the lid and quickly cover the pan with a clean tea towel and seal tightly with the lid and set aside for 10 minutes.  Add half the fried onions to the rice and stir gently with a fork.  Pile the mixture of rice and lentil on to the serving platter and top with the rest of the fried onion.  Serve warm with yogurt or raita.


All rights reserved on photographs and written content Torviewtoronto © 2012 unless mentioned. Please Ask First

Ricotta cookies and Lidia's favourite recipes cookbook giveaway

This recipe for Ricotta cookies or Biscotti di Ricotta is adapted from Lidia's favourite recipes cookbook.    I halved the original recipe to make about 18 cookies, if you make the full recipe with the quantities below it will make about 3 1/2 dozen.  I didn't add vanilla extract as I used vanilla flavoured sugar.  I also didn't coat the cookies with the suggested 2 cups of icing sugar mixed with 1/4 cup fresh lemon juice because it was sweet enough for us without the confectioner's sugar.

2 1/4 cup flour
1 tsp baking powder
pinch of salt
1 cup sugar
1/2 cup butter at room temperature
2 eggs
1 cup fresh ricotta drained
1/2 tsp vanilla extract
zest of one lemon (I think this is optional)

Mix the flour, salt and baking powder and leave aside.
Beat the sugar with the butter until fluffy and light, then add the eggs one at a time and beat well.  Add the ricotta and lemon zest if using and beat only until it combines.  Add the flour mixture and beat in low speed only till it incorporates, do not over mix.

In a cookie sheet pan with a baking sheet place a tbsp on dough about an inch apart and bake at 325F for 20 to 22 minutes until the cookies are puffed and golden.  Halfway through the 20 minutes of baking rotate the pan ones.  
After it bakes cool the cookies on a wire rack.  When the cookies are completely cool enjoy.  I found the cookies soft and delicious.
Lidia's favourite recipes cookbook has 100 fool proof Italian dishes that has got many ravings, which she has revised and updated to make it more concise and clear with information such as affordability, seasonality and nutritional value.  Looking through the book, I found the recipes easy to follow. The book has lovely pictures for some recipes, although I would have liked a picture for all the recipes.  
The content is separated into appetizers, salads/soups, sandwiches/pizzas, primi, sauces, vegetable sides, seafood, mean/chicken and desserts.  I wish the author included substitutions for alcoholic ingredients :) because there were a lot of recipes that use alcohol, which prevents me from trying the recipes.  

Giveaway
If you would like to win this book, please enter through the rafflecopter below.  The giveaway is open to people in Canada and US ends on November 20th.
Update: The winner is Eri
a Rafflecopter giveaway
All rights reserved on mentioned photographs and opinion of the written content Torviewtoronto © 2012 unless mentioned. Please Ask First

Gluten free rice flour pancakes using Ryza and giveaway

I had a wonderful time at the Maple Leaf Gardens Loblaws in Toronto cooking with Chef Patricia Muzzi using Ryza products.  
Before attending this event, I haven't used Ryza so I am glad I got the opportunity to cook with Chef Muzzi's recipes along with other bloggers.

Ryza is 100% gluten, lactose, dairy and cholesterol free beverage.  It is made using whole grain, un-milled, unpolished North American grown non-GMO rice.  It has a light taste of rice, and is not very thick.  We have to shake the carton well before usin.  Ryza is naturally sweet because of the rice grains and there are no added sugar or sweeteners.  Chef Muzzi said, that processed sugars are not healthy as it can alter proper neuron function in our brain.
Compared to other rice beverages Ryza has no added fats or oils.  One glass of Ryza equals to a full serving of whole grain rich nutrients, calcium and fibre.

There are many benefits in Ryza:
  • Ryza has calcium, vitamin A, D, B12, thiamine, riboflavin, niacin and phosphorus that gives us energy, improves our learning and memory.  
  • Calcium phosphate tribasic is a mineral salt that prevents accelerated aging of brain cells.
  • Brown rice has manganese and selenium that helps maintain healthy nerve function in the brain, which keeps us alert and focused.  
  • Selenium also detoxifies our chemical exposures i.e. our surroundings, shampoo etc.  
  • Tryptophan keeps us calm and relaxed.
Ryza is available in original and vanilla flavour.  It is sold in many stores i.e. Sobeys, Superstores, Fortinos, Zehrs, Loblaws, YIG and Health Food stores to name a few.  
Giveaway
If you would like to win 2 coupons to taste this delicious healthy beverage, leave a comment on this post and enter through the rafflecopter below.  Giveaway is open to Canadian readers and ends on October 30th.
Update: The winner is Amy
a Rafflecopter giveaway

Using the vanilla flavoured Ryza, I made these delicious Gluten free rice flour crepes following the recipe from Crepes: 50 savoury and sweet recipes book by Martha Holmberg.

This is good book that has delicious recipes of crepe using different flours.  It is separated into savoury filled crepes and sweet crepes.  In the beginning of the book, the author talks about her love for crepes, about the ingredients and equipment we will need.  The author also has pictures showing how crepes can be folded and presented.  
I changed the method of making the batter slightly for this rice flour pancakes as I think it would make the batter smooth.

Gluten free Rice flour pancakes
1 3/4 cup milk or Ryza
3 eggs
1/2 tsp salt
1 cup and 3 tbsp rice flour
2 tbsp melted butter or oil

Mix all the ingredients except for the butter or oil and beat well until smooth.  Then add the butter or oil and mix.  I strained the batter through a sieve to make sure there were no lumps.
Leave the batter to rest for at least an hour at room temperature before making the crepes.  We can prepare this mixture before hand and leave it in the fridge, I left it overnight.

Spread some butter on a non-stick crepe pan.  Make the pancakes in a medium hot non-stick pan.  Pour the pancake batter into the hot pan and gently swirl the pan in a circular motion to coat the bottom of the pan and then let the pancake cook for about a minute until the bottom is cooked.  Turn the other side and cook for a few seconds before removing from heat.
Serve with savoury or sweet.

All rights reserved on photographs and written content Torviewtoronto © 2012 unless mentioned. Please Ask First

Pasta Frittata

The Tuscan Sun cookbook is a colourful well-written book with delicious Italian recipes that are easy to follow and make.  The book is written by Frances and Edward Mayes.  The photographs by Steven Rothfeld capture the Tuscan life and cuisine beautifully.

Apple spiced donuts

apple spiced donuts
Topped with chocolate glaze or simply rolled in cinnamon, fresh homemade donuts are irresistible.  Donuts are lots of fun and easy to make at home.  It doesn't matter if it is the fluffy yeast style or denser cake variety of donuts that we prefer because this book 150 best donut recipes has a wide selection that we can choose from to make gourmet style donuts.

The book explains in detail about the equipment, common ingredients etc.  The type of ingredients we choose to make our donuts is quite important as it makes all the difference in making good donuts.  The author explains why it is important to use the correct ingredients such as 1 large egg equals 1/4 cup in volume; it is best to use cream that is 35% whipping cream; store brand butter has added moisture so use brand name butter instead.

All the steps in the book are detailed.  There is a section in the beginning of the book with pictures to show us how to make the variety of donuts i.e. raised, cake-based, baked, filled, fritters, one bite, bow ties and twists.  The book is separated by the types of donuts and has lots of recipes for each of these different types.  The end of the book has delicious icings, glazes and sugars that can be used to create an array of delicious possibilities.

Here is a recipe to make dozen Apple spice donuts.

2 1/2 cups cake flour *
1 cup sugar
2 1/2 tsp baking powder
2 tsp ground cinnamon
1 tsp freshly ground nutmeg
1/2 tsp salt
2 eggs beaten
3/4 cup whole milk
2 tbsp oil
1 tsp vanilla
1 1/2 cup finely chopped apples

* To make cake flour at home: for every 1 cup of all purpose flour I took 2 tbsp of flour away and replaced with 2 tbsp cornstarch.

Whisk flour, sugar, baking powder, cinnamon, nutmeg and salt.  In another bowl whisk eggs, milk, oil and vanilla.  Add this wet mixture to the flour mixture with a rubber spatula until incorporated.  Fold in the apples.

Put the batter into a resealable or pastry bag.  It is easier to make the bag sit in a tall glass.  Squeeze the batter to one corner of the bag then cut off the corner about 2 cm wide.  Pipe the batter into the sprayed donut pan and fill about 2/3 with batter so there is enough room for the donuts to rise when it is baking.

Bake in a 325 preheated oven for 10 to 14 minutes.  Let the donuts cool in the pan on a rack for 5 minutes then turn out onto the rack and cool completely before icing or filling.

The recipe is adapted from 150 Best Donut Recipes by George Geary © 2012 Robert Rose Inc.www.robertrose.ca Reprinted with permission.  All rights reserved on photographs and written content Torviewtoronto © 2012 unless mentioned. Please Ask First

Moroccan Spicy eggplant, tomato and garlic salad

Morocco is a cookery book written by Jeff Koehler.  There are more than 70 Moroccan recipes and awesome pictures in the book.  The rich colourful food pictures are presented beautifully.  The author shares about the landscape, culinary history and ingredients in the beginning of the book.  The content is separated into bread, savoury pastries, soups and legumes, street food, fresh and cooked salad, meats, eggs and poultry, fish and shellfish, couscous, sweets and desserts and drinks.

The book reflects North African cuisine that combines textures, bold flavours, sweet and savoury.  I like how the author describes about buying the food from the souq or market and making, touching and feeling the food when we eat.  The author points out that eating is not an individual experience it is about sharing, equality and sense of community.
Moroccan tables are round as opposed to square so guests can easily take the food and be accommodated.  The food presentation is very important, even when preparing the simplest dish.  I like how the author says "Ainek misanek," which means "your eyes will be your measure" so we have to use our finger and eyes as a guide to decide how long we have to cook, how and when to add the spice to our taste etc.  This is very important when we cook as it makes all the difference.

Spicy eggplant, tomato and garlic salad from the book.
3 eggplants (about 2lbs)
6 garlic cloves unpeeled
1/2 cup olive oil (I reduced the amount of oil to 1/4 cup)
3 tomatoes peeled, seeded and chopped, juices reserved
1/4 tsp sweet paprika
1 pinch cayenne pepper or red pepper flakes
salt
freshly ground black pepper
1 tbsp fresh parsley chopped

Peel some of the eggplant skin and discard.  Quarter the eggplant lengthwise then cut into 1" pieces.
Steam the eggplant and garlic in a double broiler by covering it snugly for about 25 minutes until the eggplant becomes soft.  Remove the garlic and cool.  Squeeze the garlic from the peels and discard the peels.  
In a skillet or sauté pan heat oil, over medium heat and add tomatoes, garlic, paprika, cayenne or red chillie flakes.  Season with salt and pepper.  Cook stirring until the tomatoes become red and pulpy for about 10 minutes.  Stir in the eggplant and cook covered over medium heat, stirring and mashing the ingredients frequently for about 20 minutes.
Garnish with parsley and serve.

Multicultural food festival
Atrium, a one-stop-shopping and office complex located in downtown Toronto, will be hosting “A World of Flavour” multicultural food festival from October 1-5, 2012.  Each day of the festival they will feature amazing deals, free food samples by local retailers and a grand prize draw for $1,000 in Atrium gift cards from the food retailers. On October 4th, Celebrity Chef Rose Riseman will be at Atrium to conduct a two hour internationally inspired cooking demonstration and host a meet and greet after the show.

All rights reserved on photographs and written content Torviewtoronto © 2012 unless mentioned. Please Ask First